Home > Hardness Tester > Vickers
Vickers Hardness Tester
Products
The Vickers hardness testing method is a static type, which follows the ISO 6507, ASTM E92, and ASTM E384 standards.
This Vickers method has a test load ranging from 1 gf as per the ISO standards and from 1 gf up to 120 kgf according to the ASTM standards respectively. These standards show that this method can be used to detect hardness for all load ranges from the micro level to the macro level through the low-load level.
It is an optical method, where the size of the indentation left by the indenter is measured to calculate the hardness value of a test sample.
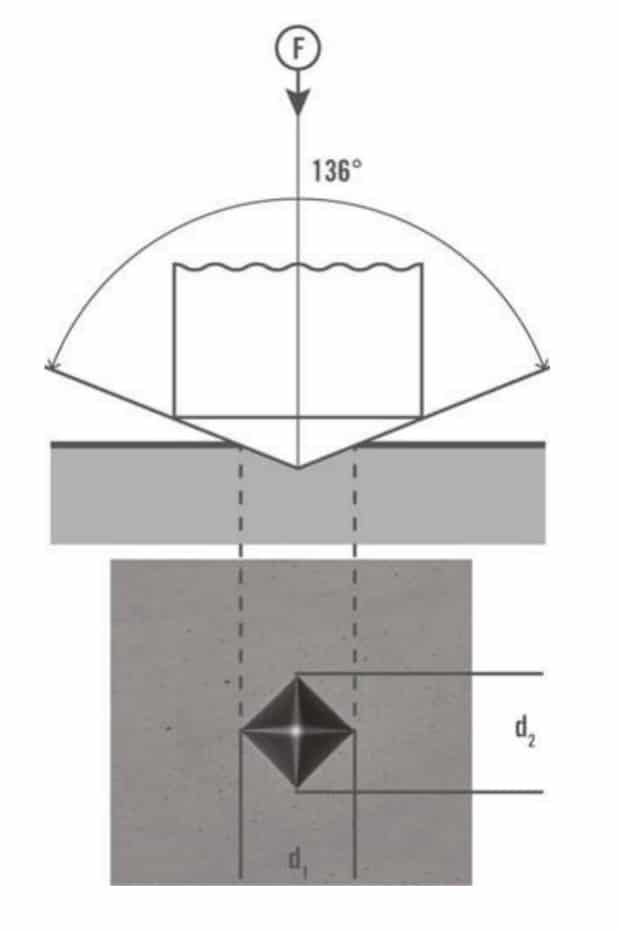
Indenter shape and material type: The indenter is an equilateral pyramid including a square base made of diamond with a plane angle of 136 degrees.
The Vickers hardness test was developed by George E. Sandland and Robert L. Smith at Vickers Ltd. in the year 1921, as an alternative to the Brinell method to determine the hardness of materials. This Vickers hardness test is usually easier to use compared to other hardness tests. The reason is the required calculations are not dependent on the size of the indenter. Similarly, the indenter can be used for all the materials irrespective of the hardness. The basic principle of the Vickers hardness test is the same as that of all other hardness tests. With the help of this hardness test, it is possible to observe the material’s ability to resist plastic deformation from a standard source. The Vickers hardness test can be used for all the available metals and it has got one of the widest scales among all hardness tests. The unit of hardness can be measured as the Vickers Pyramid Number (HV) or Diamond Pyramid Hardness (DPH). This hardness number can be converted into the units of pascals. However, it should not be confused with pressure, which is expressed in the same units. The hardness number is calculated by the load over the indentation surface area and not the area normal to the force.

Vickers values are usually independent of the test force. From 500gf to 50Kgf, it is possible that the results of the same test material may produce the same results irrespective of the force used. Vickers hardness tests can be used for test material evaluation, quality control of the manufacturing process, as well as the research and development efforts. Though empirical in nature, hardness can be correlated to the tensile strength of many metals. It is an indicator of wear resistance along with the ductility. While performing a Vickers hardness test, the distance between the indentations should be greater than 3 indentation diameters apart. This distance can prevent interaction between the work-hardened regions. The Vickers testers are usually used for inspecting the hardness of materials such as components in the automotive and aerospace industry, laboratories for test sample evaluation, as well as to perform common or advanced testing tasks.
See Other Hardness Testers:
Why Global Clients Choose Us?
25 Years of Expertise
We have 25 years of experience in the professional production of hardness testing devices, an annual output of more than 10,000 hardness testers.
Talented Engineers and support team
As of September 2020, we have a total of 125 employees, including nearly 35 professional and technical workers who are masters or doctorate degree holders.
Advanced production equipment
We have Complete machining workshop, CNC, CNC machine tools, and more than 50 other types of processing equipment,to ensure high-precision product parts.
Excellent After-Sales Service
We provided excellent after-sales service, including fast delivery, online training, immediate feedback of trouble shotting.
Need Any Help?
You tell us what you want, and we tell you our solution.
About Vickers Hardness Tester You Should Know
- What is Vickers Hardness Testing?
The Vickers hardness test method is otherwise called as a microhardness test method, where it is usually used for thin sections, small parts, or case depth work.
The Vickers hardness test method works on the basis of an optical measurement system, which follows the ASTM E-384 standards. It specifies a range of light loads with the help of a diamond indenter to create an indentation, which is accurately measured and converted into a hardness value. It can be used to test a wide range of materials, but there are few conditions to be followed for preparing the test samples. These test samples should be highly polished to allow the easy measurement of the impression size. A square base pyramid-shaped diamond is always used for testing the samples in the Vickers scale. Typically, the loads used here are very light, which ranges from 10gm to 1kgf. But ‘Macro’ Vickers loads can go up to 30 kg or even more.
The Microhardness methods are used to inspect ceramics, metals, composites, and almost any type of material. As the test indentation is too small in a Vickers test, it can be used in varied applications such as measuring individual microstructures, testing very thin materials like foils, measuring the surface of a single part or multiple small parts or small areas, and measuring the depth of case hardening by segmenting a portion and creating a series of indentations to define a profile of the alteration in hardness.
Sectioning is mostly required for the microhardness test in order to deliver a small sufficient specimen that can fit into the tester. Additionally, the sample preparation is required to make the test sample’s surface smooth, allow a regular indentation shape, proper measurement, as well as to confirm that the sample can be placed perpendicular to the indenter. Often the prepared samples are mounted upon a plastic medium for the easy preparation and testing. The indentations must be as big as possible to increase the resolution of the measurement. As the indentation size decreases, the error gets more magnified. This test procedure will be subjected to the problems of the operator’s influence on the test results.
The Vickers hardness test method involves the indenting of test material with the diamond indenter, in the right pyramid form along with a square base at an angle of 136 degrees in between the opposite faces with respect to the load of 1 to 100 kgf. The complete load is usually applied for around 10 to 15 seconds. The two diagonals of the indentation left in the material surface after the removal of the load are precisely measured with the help of a microscope and their average is calculated. Even the area of the sloping surface of the indentation is also calculated. The Vickers hardness will be the quotient obtained by dividing the load in kgf unit by the area of indentation in square mm.

F= Load in kgf
d = Arithmetic mean of the two diagonals, d1 and d2 in mm
HV = Vickers hardness

By determining the mean diagonal of the indentation, the Vickers hardness may be calculated from the above-mentioned formula, yet it is more convenient to use conversion tables. The Vickers hardness should be reported as 800 HV/10, which indicates a Vickers hardness of 800 obtained using a 10 kgf force. Varied load settings give similar hardness numbers on uniform materials, which is normally better than the random changing of scale with the other available hardness testing methods. The benefits of the Vickers hardness test are extremely accurate readings, where only one type of indenter can be used for all types of metals as well as surface treatments. Though this experiment is systematically adaptable and very accurate for testing both the hardest as well as the softest materials under varied loads, the Vickers machine is considered as a floor standing unit which is more expensive compared to the Brinell or Rockwell machines.
- How Vickers Hardness testers are classified?
Vickers Hardness testers are classified into eight types:
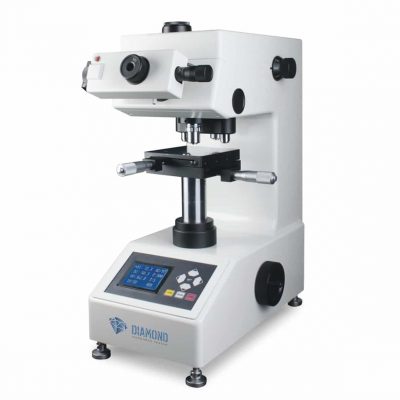
- Microhardness Tester
- Vickers hardness tester with a small load
- Digital microhardness Tester
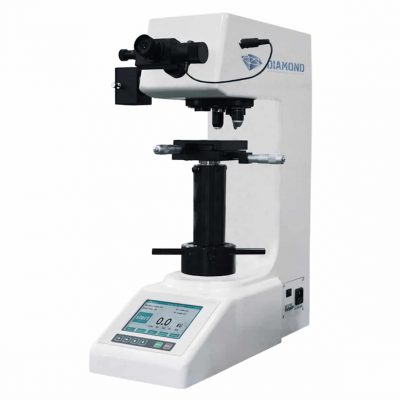
- Digital Vickers hardness tester
- Video Screen microhardness Tester
- Digital touch screen microhardness Tester
- Automatic rotating Tavis Hardness Tester
- Automatic Vickers Hardness Tester
- What is the working procedure of the Vickers hardness testing?
The Vickers hardness test is an optical method, where the size of indentation (i.e., the diagonals) left by the indenter is measured. On the contrary, the standardized Rockwell testing method is used to measure the depth of indentation caused by the indenter. The larger the indent left by the indenter at a well-defined test force in the specimen (workpiece) surface, the softer will be the test material.
To determine the Vickers hardness (HV) according to the ISO 6507 standards, the pyramid-shaped indenter along with the interfacial angle of 136 degrees is pressed into the test specimen (workpiece) with a well-defined test load from 1 gf.
Calculation of the Vickers hardness
The Vickers hardness (HV) is calculated from the quotient of the implemented test force (F in newtons N) as well as the surface area of the residual indent upon the specimen. The calculation formula is given below. To determine the surface area of the residual pyramidal indentation, the mean of the two diagonals (d1 and d2 in mm) is calculated. The reason behind this calculation is that the base area of Vickers indents is often not accurately squared.
The recommended range of Vickers hardness value can be found in the ISO 6507 standards. Depending on the test force as well as the used specimen material, the Vickers hardness value lies between 1 and 3.000 HV.


Application of the test force
Preferably, the test force is instantly increased from 0 to its final value within 7 seconds. This is called as the minimization of measurement uncertainty. The largest permissible interval for the application time away from the standard is between 2 to 8 seconds, while the nominal time duration can be 7 seconds. Usually, the dwell time for the test force is 10 to 15 seconds, where the nominal time duration will be around 14 seconds. If this dwell time goes longer, the extra duration in seconds must also be mentioned in the hardness value like 610 HV 10/30 (where the dwell time will be 30 seconds). The test forces used in the macro range of this Vickers method are considerably lower than those used in the Brinell method. The usually preferred choice for the macro level will be 49, 98, 196, 294, 490, or 980 N. But here, 294 N is used most frequently for testing.
Minimum distance of the test points
In the Vickers hardness test method, the indents should be positioned in such a way that there is enough clearance from the edge of the specimen as well as between the individual indents. The minimum observed values according to the standards can be found below.

- What are the specimen requirements for the Vickers hardness testing method?
While using the Vickers hardness testing method, it is mandatory to prepare the surface of the specimen to be tested. Hence, the specimen surface quality requirements are stricter compared to the Rockwell method, where it is enough for the surface to be clean and free from impurities.
The specimen to be tested should meet the following requirements in the case of the Vickers method:
- The specimen should be well polished (microhardness testing) or precision-ground (macro hardness testing).
- It is preferred to clamp the specimen strongly so that it remains immobile during the testing procedure. Here is the practical tip: After measuring with a suitable test anvil, fix the embedded specimen in a specimen holder.
Additionally, care should be taken to ensure that the test should not be disturbed by any vibration or shock. It will be better to use an anti-vibration table to avoid any disturbance which may affect the test result.
- What are the available methods and the respective applications for the Vickers hardness testing?
Depending upon the magnitude of the test force as per the ISO standards, the Vickers process can be subdivided into varied methods such as HV 0.01; HV 1; HV 10, etc., as well as three hardness testing load ranges such as micro, low-load, and conventional (macro) hardness range.
The applications of Vickers methods depending on the respective load range are listed below:
Load range | Method | Indenter | Test force F | Applications |
|
Micro hardness range | HV 0.01 | Diamond pyramid 136° | 0.098 N | Structural constituents, very thin layers | Range 1 HV – 3000 HV |
HV 0.025 | 0.245 N | ||||
HV 0.05 | 0.490 N | ||||
HV 0.1 | 0.980 N | ||||
Low force hardness range | HV 0.2 | Diamond pyramid 136° | 1.961 N | Thin layers CHD/SHD/NHD series, thin sheet metals, small specimens | |
HV 0.3 | 2.942 N | ||||
HV 0.5 | 4.903 N | ||||
HV 1 | 9.807 N | ||||
HV 2 | 19.61 N | ||||
HV 3 | 29.42 N | ||||
Macro range (Conventional hardness range) | HV 5 | Diamond pyramid 136° | 49.03 N | Normal specimens | |
HV 10 | 98.07 N | ||||
HV 20 | 196.1 N | ||||
HV 30 | 294.2 N | ||||
HV 50 | 490.3 N | ||||
HV 100 | 980.7 N | ||||
*recommended hardness range according to ISO 6507-4 | |||||
- What are the factors that play a role in the selection of the correct test force (test load) as well as the test method?
- The specimen size (the lowest clearances between the test points (indent spacing) and the specimen edge (edge clearance) for the Vickers method defined in the standards must be taken care of.
- The specimen thickness (the specimen thickness should be at least 1.5 times the indentation diagonals). The minimum specimen thickness must be between 0.085 and 6.5 mm.
- The surface quality of the specimen should be polished. Especially for very low-test loads, a good specimen surface is required to calculate the accurate measurement. Since the Vickers indent is exceedingly small in this case, even the smallest irregularity may affect the final measurement.
Usually, the test specimen should be measured with the highest possible test force, and minimize the potential influencing factors that can change the final result.
- How to read and represent a Vickers hardness value?
A Vickers hardness value includes the following components:
- The numeric hardness value (between 1 and 3000)
- The two letters ‘HV’ which stands for ‘Hardness according to Vickers’
- The applied test load in kgf
- According to the ISO 6507 standards, the dwell time of the test load is also taken into consideration, only if it is not between 10 to 15 seconds. Anyway, it is usually rare in practice.
- What are the advantages and disadvantages of the Vickers method?
The Vickers method has the following advantages:
- The Vickers method can be applied in all the materials from soft to hard since this procedure covers the complete range of hardness.
- There is only a single type of indenter, which can be used for all Vickers methods.
- Since it is a non-destructive testing, the test specimen can be used for other purposes.
The Vickers method has the following disadvantages:
- The surface quality of the test specimen must be proper since the indent is measured optically. Hence, the test location must be well prepared such as ground and polished. Or else, the precise evaluation may become very difficult.
- This Vickers process is quite slow, compared to the Rockwell method. This test cycle always takes between 30 to 60 seconds. This calculation does not include the time taken for specimen preparation.
- To perform an optical indent evaluation, Vickers hardness testers should be equipped with an optical system. Hence, this Vickers tester will become more expensive to purchase compared to the Rockwell testers.
Usually, the Vickers method is the most common practical testing method due to its varied applications, though it is time consuming and laborious to prepare the specimens and evaluate their hardness value.


